
Grandma’s Homemade Hand-Cranked Vanilla Ice Cream
The reason that homemade ice cream has to do with the polarity of water. Basically the water molecules in your ice cream wan to pull together or coalesce. Once frozen, the water is stuck in place and the polar ends of the molecules can no longer stick together. It’s all about making tiny ice crystals. And you can do it without stabilizers and other chemicals, as they do with the commercial versions of ice cream.
Recipe From Florence
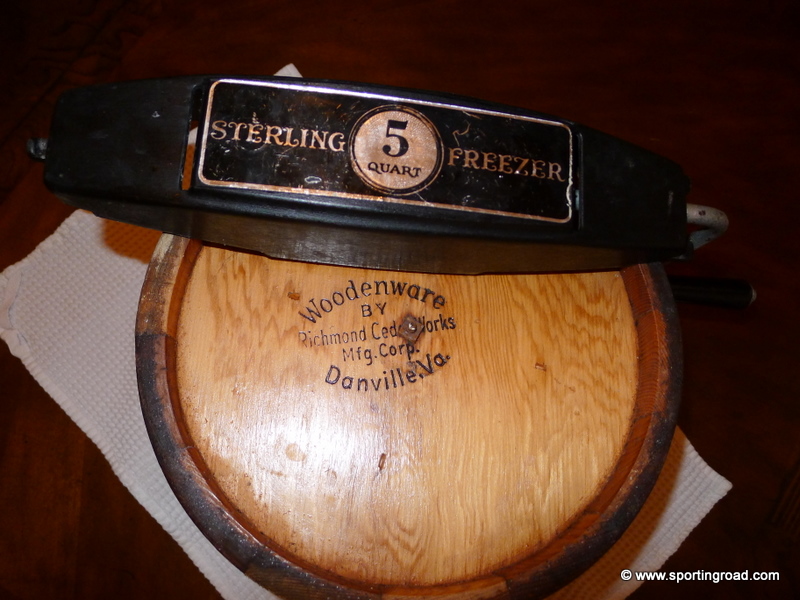
Get yourself an old-fashioned hand-crank, 4-5 quart, Ice King or Sterling Freezer ice cream maker from Richmond Cedar Works. I realize that they are out of production for many years now, so you’ll have to get one second-hand from some place such as eBay, unless you happen to have one passed down the generations to you, but mine still works fine from the 1960’s. This method is touted by professional chefs, including one who just wrote a book on ice cream.
This recipe takes about 45 minutes to make, so make sure you have reinforcements for the hand cranking, as it’ll take at least 2-4 persons to make this recipe (a bunch of kids are even better, as they never run out of cranking abilities). But seriously, don’t even bother buying an electric ice cream maker (we have owned one and it doesn’t matter what kind or how much you spend) as it’s simply not possible to make the same consistency as in the home-made and hand-cranked model, and the electric-made alternatives will always come out watery and less tasty.
 INGREDIENTS:
- 5 eggs
- 1 3/4 cup sugar
- 1 can Carnation Milk
- 1 pint whipping cream
- 3 T. vanilla
- 1 pinch salt
- 1 qt. whole milk
- 10 lb bag of ice cream salt
Mix all of the ingredients but the last two, so you whip up in a kitchen stand mixer the:
- 5 eggs
- 1 3/4 cup sugar
- 1 can Carnation Milk
- 1 pint whipping cream
- 3 T. vanilla
- 1 pinch salt
(Any kind of fresh fruit can be added: strawberries/blue berries/peaches, etc., but we like it vanilla, with the fruit added on top with a bit sugar added in advance to the defrosting fruit to make a fruit syrup)
DIRECTIONS:
Pour mixture into container and add a quart of whole milk.
Lock container in wooden bucket.
Fill nearly to the top of the wood bucket full of snow (or ice cubes) and add coarse salt (the coarse kind like you would put on an ice patch on sidewalk is fine, but ones for ice cream are better as they are free from chemicals, but your salt solution should never touch the ice cream anyway, as it’s in a sealed container), push snow down with a stick around the bucket, and add more salt to container; continue until bucket is full to the top – total use of salt is about 10 pounds; continue turning until done or until it is too difficult to turn any more than a crank or two, at a time–about 45 minutes if you have sufficient ice and salt at all times.
ALTERNATE VERSION FOR PINT SIZED CONTAINER (UCO Ice Cream Ball):
Ingredients
- 1 pint of heavy whipping cream
- 1 teaspoons vanilla
- 1/3 cup sugar
- 1/4 cup sweetened condensed milk
- 1 egg
Yield: about a pint of smooth and creamy ice cream.
Directions
Mix all the ingredients together in a stand mixer, then put into the ice cream ball, on the ice cream container side. On the other side, fill the ice portion of the ice cream ball with ice. Add 1/2 cup ice cream salt (or rock salt) to the ice. Roll, spin, stir, toss, flip, and shake the ball around for 10 minutes. Open up the ice cream ball, stir, close ball. Drain some water from ice section, add more ice and salt. Roll, spin, stir, toss, flip, and shake for another 10 minutes. Enjoy your tasty homemade ice cream.
ALTERNATE VERSION -CEREAL MILK ICE CREAM FROM MOMOFUKU
Cereal milk is made. Panna cotta, conquered. Easy, right? On to ice cream. Scoop the ice cream into your favorite pie crust (see page 59 for our Cereal Milk Ice Cream Pie), sandwich it between your favorite cookies (mine is the Cornflake-Chocolate-Chip-Marshmallow Cookie, page 55), or scoop it into a bowl and decorate with your favorite breakfast cereal and jam or jelly.
Ingredients
- 1 1/2 gelatin sheets
- 1 recipe Cereal Milk (page 35)
- 4 g freeze-dried corn powder (2 teaspoons) (see page 18)
- 30 g light brown sugar (2 tablespoons tightly packed)
- 1 g kosher salt (1/4 teaspoon)
- 20 g milk powder (1/4 cup)
- 50 g glucose (2 tablespoons)
- For the cereal milk:
- 100 g cornflakes (2 ¾ cups)
- 825 g cold milk (3 ¾ cups)
- 30 g light brown sugar (2 tablespoons tightly packed)
- 1 g kosher salt (¼ teaspoon)
Cooking Directions
For the cereal milk:
Heat the oven to 300°F.
Spread the cornflakes on a parchment-lined sheet pan. Bake for 15 minutes, until lightly toasted. Cool completely.
Transfer the cooled cornflakes to a large pitcher. Pour the milk into the pitcher and stir vigorously. Let steep for 20 minutes at room temperature.
Strain the mixture through a fine-mesh sieve, collecting the milk in a medium bowl. The milk will drain off quickly at first, then become thicker and starchy toward the end of the straining process. Using the back of a ladle (or
your hand), wring the milk out of the cornflakes, but do not force the mushy cornflakes through the sieve. (We compost the cornflake remains or take them home to our dogs!)
Whisk the brown sugar and salt into the milk until fully dissolved. Store in a clean pitcher or glass milk jug, refrigerated, for up to 1 week.
* Toasting the cornflakes before steeping them deepens the flavor of the milk. Taste your cereal milk after you make it. If you want it a little sweeter, don’t be shy; add a little more brown sugar. If you want a more mellow cereal milk, add a splash of fresh milk and a pinch of salt.
For the ice cream:
Bloom the gelatin (see page 29).
Warm a little bit of the cereal milk and whisk in the gelatin to dissolve. Whisk in the remaining cereal milk, the corn powder, brown sugar, salt, milk powder, and glucose until everything is fully dissolved and incorporated.
Pour the mixture through a fine-mesh sieve into your ice cream machine and freeze according to the manufacturer’s instructions. The ice cream is best spun just before serving or using, but it will keep in an airtight container in the freezer for up to 2 weeks.
Powdered gelatin can be substituted for the sheet gelatin: use 3/4 teaspoon. In a pinch, substitute 18 g (1 tablespoon) corn syrup for the glucose.
Instead of a whisk, use a hand blender to mix the ice cream base.
freeze-dried corn (from page 18)
Get regular freeze-dried corn from Whole Foods, amazon.com, or justtomatoes.com. They all offer an organic version, but it’s not the same in flavor or color. We grind the corn down to a powder in the blender before we use it, so do the same in your kitchen. Make sure you store it in an airtight container, because otherwise moisture will get to it, and it will make you very sad.
blooming gelatin: get it right, or do it twice (from page 29)
In order to incorporate it seamlessly into a mixture, gelatin must be softened, or “bloomed,” first. To bloom any amount of sheet gelatin, soak it in a small bowl of cold water.
The gelatin is bloomed when it has become soft, after about 2 minutes. If the gelatin still has hard bits to it, it needs to bloom longer. If it is so soft it is falling apart, it is overbloomed; discard the gelatin and start over. Gently squeeze the bloomed gelatin to remove any excess water before using.
To bloom powdered gelatin (any amount between ½ teaspoon and 2 teaspoons), sprinkle it evenly onto the surface of 2 tablespoons of cold water in a small cup. If you pour the powdered gelatin into a pile on top of the water, the granules in the center will remain hard and will not bloom. If you use too much water to bloom the gelatin, it will dilute the flavor of the recipe and its consistency will be looser than intended. Allow the granules to soften entirely in the cold water for 3 to 5 minutes.
Once it is bloomed, in order to incorporate either kind of gelatin into a mixture, you need to dissolve the gelatin in hot, but not boiling, liquid—usually a bit of whatever it will be mixed into. If the gelatin gets too hot, it will lose its strength and you will have to start over again.
This recipe was styled by chef Karen Pickus for Good Morning America.
Recipe courtesy the Momofuku Milk Bar cookbook.