

“If you are not satisfied with your pictures, move in closer. And photography isn’t about the gear, it never was.” -Collector
A Leica won’t solve your life problems. It will give you street cred though.
I read somewhere that, “Photography is a form of nonverbal communication. At its best, photograph conveys thought from one person and the photographer, to another, the viewer. In this respect, photography is similar to other forms of artistic nonverbal communication such as painting and sculpture and music. I mean if a photograph does several things. Allows her forces, if you were to say things that he has looked at many times without really saying. It shows them some thing he has never previously encountered. Or, it raises questions perhaps ambiguous are on answerable the great mysteries, Dauster and certain days. In other words, it expands or creates fission in our thoughts. It extends our horizons. And it inspires, wonder, amusement, compassion, war, or any other thousand responses it sheds new light on in the world, raises questions about our world, or questions our approach to personal expression.”
I have progressed from a film Minolta Maxum to a Sony A77 digital DSLR some decade ago (which I originally bought because I had all the Minolta Maxum lens that would fit on it), but several years ago, we upgraded to the new Sony version of the L series lens, in 80-300mm, which was pricey. The new lens made a big difference for fast action horse sports, as it focuses much faster. I have tried using the vivid setting on camera to get them to come out like Zina’s, but I don’t like the way it affects other candids (it make everyone and everything glow, which is fine if you just stick to the polo horse sport type of shots or fox hunting). One of the advantages of modern digital cameras is their ability to capture an extraordinary dynamic range, preserving detail in both deep shadows and bright highlights. Much like the best film cameras of years past, today’s systems allow photographers tremendous flexibility when interpreting images during post-production. Whatever system you choose, pros strongly recommend carrying two camera bodies. Accidents happen—whether you’re wading remote flats, climbing into a helicopter, or traveling far from the nearest camera store. When you’re on assignment or on the trip of a lifetime, a backup camera isn’t a luxury; it’s essential. Further, you can outfit one for telephoto and the other for portraits. Then I had the traditional assortment of lenses. First, a 16–35mm f/2.8, a versatile wide-angle lens is perfect for expansive landscapes, dramatic fish photos, lodge interiors, and any situation where you want to capture a sense of place and scale. Second a 24–80mm f/2.8 and I could travel with only one lens, this would probably be it. A true jack-of-all-trades, it handles landscapes, action shots, environmental scenes, and portraits with equal ease. And finally a EF 100–400mm f/4 with outstanding image stabilization and excellent reach, it’s ideal for photographing wildlife—bears, birds, giant otters, and all the other creatures that make destination fly-fishing trips memorable. It also excels at isolating subjects and creating beautifully blurred backgrounds. A macro lens and some others rounded out the kit.
However, when a dial on the A77 became broken after a hot day in the car and something got on the lens that caused a spot that couldn’t be removed, I replaced it with a A77ii, but opted not to upgrade to A99 because 20MP is enough, as I don’t need to deal with 44MP images and their resulting storage issues, etc., with the vast number of shots we take at polo. The A77ii has a unique focusing system, which is both good and bad compared to the A77 and here’s a guide that explains all of the settings: https://cvp.com/pdf/sony_a77_ii_af-guide_en.pdf The new lens has since taken on too much dirt inside the lens to make the photographs workable. So I am moving on to the Nikon D3 and Leica ME. I had never considered getting a new one. To me, the M9/M-E is already a classic. It was the first full-frame rangefinder, features no AA filter, and has a CCD that gives images a unique quality. Some people even claim that newer Leicas with CMOS sensors will never capture the same magic as the M9/M-E’s CCD sensor. I set the camera to shoot JPEG + RAW, and on the JPEG settings I select “black & white” on the M-E. The back screen may be low-resolution and was already considered outdated at the time of the camera’s launch, but its retro charm brings me joy, especially by 2018 standards. Using it feels like handling a vintage camera, which I love. Despite its small size and slow response, it’s still functional—I can zoom in to check focus, and that works just fine for me. It feels like driving a vintage car, which is exactly what I wanted, a camera that felt and looked like (and produced images) as close to black and white film as possible.
But then I went to the Nikon Pro bodies and they are just spectacular for sports photography. There’s just something so special I find with the D4 or D5 files. They’re nothing but spectacular and the results phenomenal. ISO isn’t even a concern for me. I’ll shoot 32,000 ISO all day long and with it’s sensor and it’s onboard software handling of noise along with modern day post software, so with even the D4, ISO noise is nearly a thing of the past.
https://cdn-10.nikon-cdn.com/pdf/manuals/dslr/D4_TechnicalGuide_En.pdf
General Tips
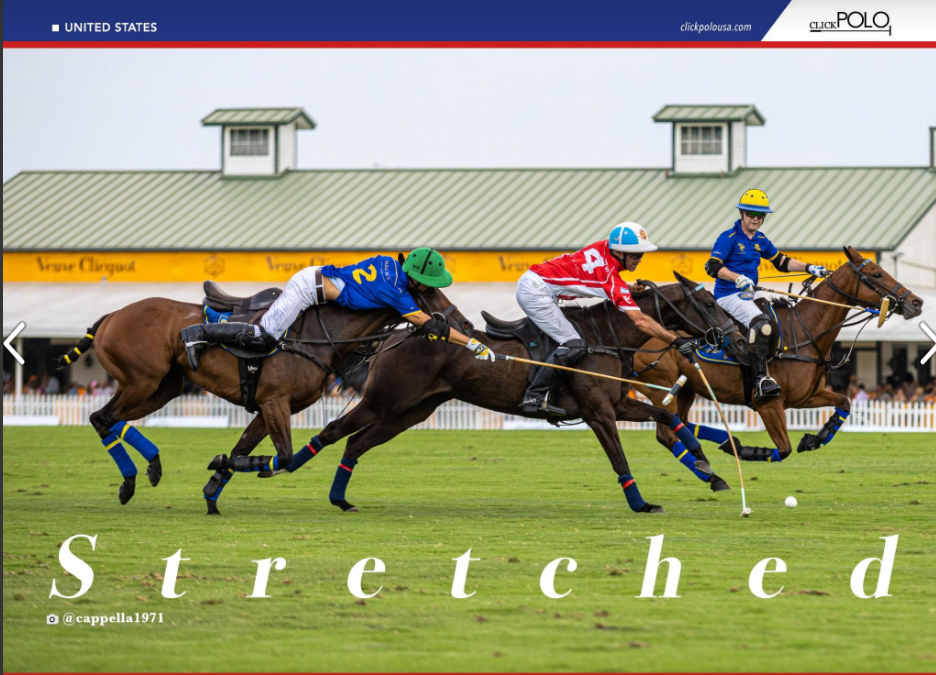
For polo, some basic tips we received were to shoot from down low, kneeling when possible as it creates more dramatic angles. Make sure ISO is 1600-3200. Use a class 10 disk in the camera for faster speed, we like the Extreme Pro SD cards. Set the dial to continuous focus. Use rapid continuous shooting shutter action. Use “lock on expand flexible point” focusing on the new Sony. Take lots of pictures, as most will not capture the action the way you anticipated, until you process them. Shoot jpeg not raw for sports or you will be inundated.
https://erickimphotography.com/blog/wp-content/uploads/2020/06/Zen-Photography-by-Eric-Kim.pdf
For Point and Shoots
I also have a Leica D-Lux 5 Type 109, after having had a couple of earlier Leica digital point and shoot cameras such as the D-Lux 4 and the V-Lux, together with a Fuji Pix, which weren’t quite as good as the D-Lux overall, but had some advantages like bigger zoom, faster frames per second, etc., so they were all decent in other ways.
The D-Lux 5 instruction manual is found here:
https://www.manualslib.com/manual/701859/Leica-D-Lux-5.html
For Shooting Horses in a Dimly Lit Barn
There is a modest trade off in image quality versus functionality. I tend to use the D4, with a 35-80mm lens, jack the ISO way up to over compensate for the lack of light. This way, I can shoot fast enough to stop action. Where it gets tricky is with open apertures, depth of field suffers. I’d try to choose an f8 setting and then hike up the ISO to get to at least 1/125 of a second. 250 would be better. The down side, is when ISO are ratcheted up, there is some pixelation and a loss of image quality. However, it’s a pick your poison trade off and I find the higher ISO the solution, regardless the artifacts.
Vivid Camera Setting for Sony Camera Setting
Creative Style option on the Function menu allows photographers to set the A77’s color mode. Six preset options are available — Standard, Vivid, Neutral, Portrait, Landscape, and B/W. For all six choices, Contrast and Sharpness levels may be adjusted in seven steps. In addition, all but the black and white mode offer seven-step control over saturation. A separate Color Space option under Screen 3 of the Record menu lets you choose between sRGB and AdobeRGB color spaces, with sRGB being best for viewing images on a computer, and Adobe RGB the best choice for printing.
For Indoor Horse Sports
For indoor jumping pictures, raise the ISO more, use a 24-70 or 15-50mm lens ($699).
Here’s What Our Friends the Pros Do:
Sarah
No real tips from her yet, but I love her compositions of horse and shooting sports. https://www.sarahfarnsworth.co.uk
Zina
https://zbalash.zenfolio.com/ – Shoots in RAW.
From Zina, “Use RAW not jpeg. I’m still using the same gear – I have a Nikon D3s body and I generally shoot with the Nikon 80-400 lens at the hunt. I shoot in “standard” color (Adobe), but switch to “vivid” on occasion and I do all my post processing in Photoshop – I just haven’t had the time/inclination to learn Lightroom.”
Tom
https://maxmxphotography.smugmug.com
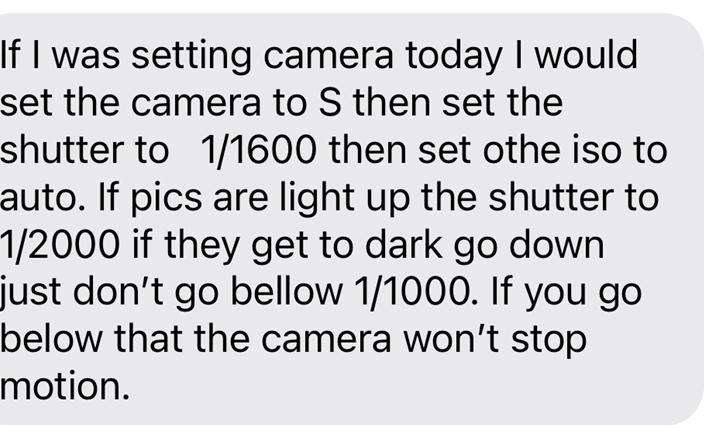
If I was setting camera today I would set the camera to S then set the shutter to 1/1600 then set othe iso to auto. If pics are light up the shutter to 1/2000 if they get to dark go down just don’t go bellow 1/1000. If you go below that the camera won’t stop motion.
Canon 2x lens extender and 70-200 lens with Canon Mark IV.
He likes using a back button on camera body.
Uses the free Canon Image Gateway for Dropbox type sharing.
Scott
Scott says, “I shoot JPG…RAW is for something that I’m going to really edit of landscape shots etc…For sports its mainly JPG…RAW is too large of a file and besides its takes a long time to ‘write it’ to the card in the camera. I use MetalPix or a Groupon from time to time for printing to metal frames.”
For polo photography, he says, “I use a Canon 5d Mark III – with the 100-400 f.56 zoom II lens and also the 70-200 f2.8 I lens. I use Manual settings mostly because I can control the look and feel of what I want (ISO is usually set to 400 to 800 depending on light) (shutter speed is 800 on up) (f-stops are set as low as I can go so f2.8 or 5.6 depending on the lens).
ABSOLUTELY NO filters on the lens – as one person said why buy a $2000 lens and put a $100 piece of plastic in front of it…Now I will say this I do use a circulizing polarizer from time to time, to help offset the green grass, and make the clouds pop.
I use Lightroom 100%. I don’t like their current model of the cloud based software and hope they will go back to a one time standalone license program, instead of a monthly fee. I want to get Heather presets for Lightroom, but can’t see paying a monthly subscription fee. I have various presets for my sports (polo, rugby, etc.) that I use constantly in order to keep the players/rider and horse at the correct exposure etc. Cropping the shots probably takes the most time.”
__________________________________
Jim Meads
Jim Meads Photographs His 500th Hunt
“The Running Photographer,” Jim Meads achieved a personal milestone and undoubtedly established a world record on December 5, 2010 when he photographed the Loudoun West Hunt near Leesburg, Virginia. Fox hunting Life writes, “This was the five hundredth unique hunt that Meads has photographed over the course of a career spanning sixty years.
Meads, who lived in Wales, follows hunted on foot and in vehicles and always seems to appear where the action is, even before the mounted followers arrive. His long legs and astounding endurance has allowed him to capture many of the greatest action shots of foxhunting ever recorded on film. He has photographed hunts in England, Ireland, Canada, and the U.S.”
He used an older Cannon DSLR with an unremarkable 80-200 lens and let his feet do the zooming.
Jim B.

https://www.facebook.com/jim.browning.96/photos
Olympus TG-5 Waterproof Camera with 3-Inch LCD, Red
USES HDR FILTER ON PROCESSING
https://gizmodo.com/enough-with-the-hdr-already-1589487629
_______________________
Ford
Shot the London Olympics for USA TODAY in all Equestrian Events and Modern Pentathlon, among many other interesting publications and assignments.
When she is not on assignment, she likes to sell images on Getty, which are then picked up by many sources.
https://www.gettyimages.com/photos/mcclave?phrase=mcclave&sort=mostpopular
___________________________
Ben
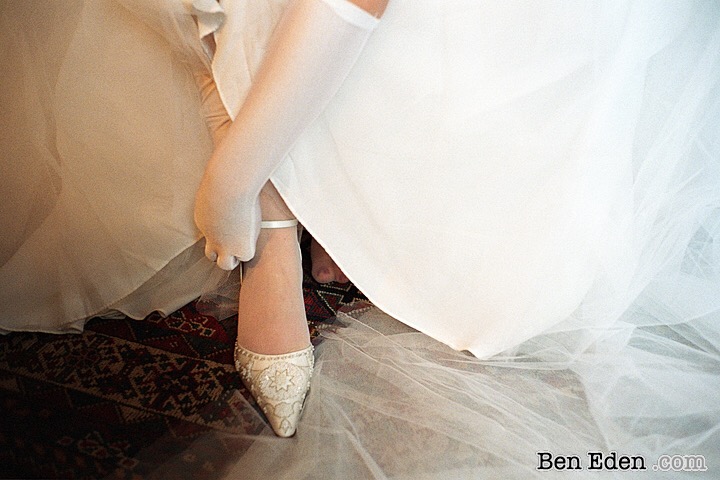
http://www.beneden.com/. From Ben Eden, our wedding photographer:
In 2003, Ben wrote, “I use Leica M-series rangefinder cameras, almost exclusively. They are my cameras of choice for documentary work. In my opinion, there’s no better camera for candid wedding photography. The cameras are tiny and understated in appearance and their shutter release is hardly audible. I also really like the look that Leica lenses are, quite rightly, famous for.”
In recent years, he says, “I have made the move with the times and now use full-frame digital SLR cameras by default for wedding photography. On request, I do use Leica film equipment, unfortunately I have to charge a substantial premium for the considerable extra effort involved in processing and scanning film.”
_____________________________
Ron
Uses Adobe Camera Raw. Wants to try the Nikon Z0, but it’s backordered.
___________
Chris

___________________________
Stephen

For more info on Uncle Stephen, visit his site at https://stephencollector.com/.
Collector often uses “a D4 with my ubiquitous lens, a Nikkor VR f3.5 24-85 mm lens. The Vibration Reduction is great image stabilization at slow shutter speeds. Phenomenal. It’s not expensive at all and it’s razor sharp.”
He has given me a ton of advice, which was very helpful:
In terms of perspective, the so called ‘normal’ lens is as you know, 50mm which supposedly replicates the human eye’s angle of view. Early in my career I tended towards wide angle. The 28mm was my go to lens, but I also shot the 20mm. The 35mm lens was extremely popular with some terrific street photographers like W. Eugene Smith and Jill Friedman to name a few. With my zoom lens at 85mm you get a pretty acceptable portrait perspective. So, for me, this lens is the perfect editorial lens. A lens that is so useful that on my sporting assignments these days, I find myself with just this body and lens and I can usually get by. I take it on float trips a lot on assignment. It’s plenty wide but one could make the argument, that 50mm perspective allows for most all situations. So this zoom covers the middle on both ends at extremely useful perspectives. It’s light and compact. I always use a lens shade despite what Ken Rockwell preaches.”
But he also likes Leica M6 with B&W film and states: That is why I shoot my Leica with the 50 and not with a 35mm because at 50 I can shoot portrait and landscape. Of course, this isn’t for wildlife. An 80-200 is my next most useful lens for outdoor work and portrait work and action/sports. But, it’s cumbersome.
But, having been shooting snaps professionally for decades, one comes to understand the importance of atmosphere. Photos are not paintings, where the painter can reimagine atmosphere at his discretion. A cloudless sky (bald sky) is problematic for the landscape photographer. Atmosphere is nothing that can be faked. It’s timing and to be savored. Fog in these parts happens very rarely, so I am already versed to ambush it.
And, finally, my sporting endeavors, which include both fishing and hunting are for me, also opportunities to make images. And frankly, once the feathers fall back to the ground, the blood soaks into the earth, the meals are consumed, it is the pictures that last. I’ve found a way to blend this all together..”
For processing, I use Photoshop or Capture One. He states, “While I gravitate towards B&W film, I live in a world of living color and embrace that too. I am thrilled every time I walk by it, because it takes me back to that moment in time, with the cold stillness and beauty of where we get to live. I’ve long felt that photography has little to do with the camera. That said, why did I feel I needed to make two different shotgun upgrades in the last 13 months?
If a new camera provides the allure to pick it up, then I would contend, it’s “worth it.”
However, in terms of image quality, one should always consider the final usage of the images. For instance, we now live at a time where most of our imagery is posted online. Instagram, for example, or Facebook require next to no real high resolution. The images are very low resolution and modest in size. Your blog [the one you are reading] for example requires very little picture quality.
If one were doing this commercially, as I did and do, the old technology cameras from the early 2000’s were delivering only 6 megapixels. A 6 megapixel file is more than sufficient for most magazine reproduction if one has some photoshop skills in post production. Nowadays, all camera are twice that at least.
So, the two Leicas [he likes the M6 film but is referring to the M9 and m10], one with 13MP and one with 17MP for most applications would suffice. The 17 megapixel camera will deliver a superior print at 12 x16 or larger if that is your intent. If you are content with 8x10s you would hardly discern any difference. And online, the chip technology of either camera would indiscernible.
There is a great amount of ‘pixel envy’ among photogs these days. It’s like having more horsepower or a bigger dick. But, honestly, no one cares. No one cares about anything beyond their own self interests these days. And the only people who scrutinize pictures, are nerds, gear heads, and people in the trade.
What matters is simply using the tool, not so much the tool itself. If you possess a decent Leica, then you are good to go in my estimation. But if the cash is burning a hole in your pocket and you think it will make you a ‘better’ photographer, then run right out and buy [a newer one].
I recall the immortal words of the NYC photog, Arthur Fellig, known as Weegee: “F8 and BE THERE”. That’s the battle cry and mantra of all photographers world wide.
And, after a serious cross examination about getting a Leica M9:
I’ll be blunt. And I am speaking of ‘helping’ you. Forget the whole Leica approach to start with.
If your INTENT is to shoot film, buy a Nikon F3. Have it checked out first. The light meter on this camera is fabulous. For the cost of a body, a 50mm f1.8 and 35mm f2, you pay less than I paid for my 50mm Summicron. Maybe 600.00 for all on ebay.
Photography was never about the camera or the glass in spite of what is advertised. I have both the F3 and the M6. In all honesty, I can not tell any significant difference between the two negatives.
Photography is about make the effort it takes to pick it up, to have it on hand, and when the whim strikes you, to take a snap. To simply make the time to take pictures. F8 and Be There. Nothing more, nothing less. The light meter on the F3, once you set the ASA properly for the film you select, will make good negatives.
A Leica won’t change anything. One could argue, that if one had the ‘best,’ then one may be more inclined to use it. But, if that is the case, than perhaps another art form might be a better pursuit. We make pictures with our minds, and with our eye. Nothing else matters.
_________
He continues his tutelage of me:
So, this is a ‘trick’ I learned from my photography teacher friend, Tom Fink who lives in Denver.
Shooting negative film, you take a light meter reading on the palm of your hand. Your meter is engineered to read the entire scene and interpret it into the middle tonal value of 18% grey. Well, one’s palm is brighter than grey. So, I take such reading and then open the aperture 1 stop.
This ‘places’ the value on, instead of zone 5 (18% grey) to a zone 6, the value of Caucasian human skin tone. It’s very accurate and doesn’t require a spot meter, (which I also use to determine highlight and shadow value which determines how to both expose and develop one’s film, a la Ansel Adams in his zone system manual.)
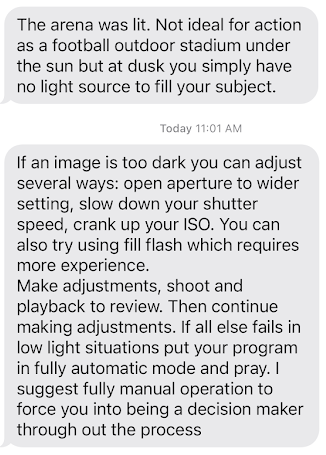
I have an internal light meter which I set up before we started walking, determining the exposure. The illustration you shared is an excellent place to start. I use that focus table a lot. Because you will be shooting digitally, set the menu to shoot in raw. This will allow for mistakes in exposure. Trust your light meter. Make an exposure and hit the play back. In the beginning take a look at your histogram. It’s a very helpful tool. Google how to read it. If light isn’t changing then stay with what you determine. On days of clouds and sun you will have to adjust as need be obviously.
Set the ISO to a lower setting to begin with. You can later determine how your sensor performs at higher ISO. With my D4 I can see little difference between 100 and 400 ISO so feel confident to use higher ISO. However, if you were to make landscapes I’d shoot lowest ISO setting to be sure I am getting best pixel performance. It is all about that in digital.
Leica
Leica D-Lux 109 is Leica’s compact point and shoot camera that was announced back in 2014. It is an equivalent to Lumix LX100. Both cameras are basically same with Lumix being cheaper, but it didn’t include Lightroom and there was debates if it had the same Leica lens, so I forked out the $1200 and got the Leica. We bought it to upgrade from the first D-Lux model, which became outdated with lower resolution and other issues. We also had the Lecia C, which was an ultra zoom model which wasn’t great for anything but is slightly smaller. We thought it might work on horseback, which it didn’t do well. The Fuji FinePix was much better but is also becoming a little dated in 2020. The D-Lux 109 is equipped with fast f/1.7-2.8 DC Vario-Summilux 24-75mm equivalent lens. Which is a zoom lens which comes out when you turn on the camera. Its has 1 ring with aperture and one multi-functional ring that you can set in the menu for multiple things such as focusing, zoom or ISO. On the left side of the ring you can set your focus to auto, macro or manual (which we never use since the auto focus is great). On the top you can set your aspect ratio to 3 by 2, 16 by 9, 4 by 3 or square ratio for photography. You can record video only in 16:9 format. It also records in RAW or JPEG.
So I finally decided to take the plunge with trying a Leica M9 or M-E kit as the D-Lux just wasn’t really the same experience that I was hoping for, though it was great shooting in low light and easy to travel with, but I found myself using my iPhone a lot more than the D-Lux and I wanted to get back to some photography along the Sporting Road. The original owner of the Leica M-E had the sensor replaced by Leica and the paperwork reflecting this is included with the camera, along with the original sales receipt from the original owner. The M9 or M-E is known as being the greatest camera ever devised, at least as far as digital cameras go. Going back to film, with something like the M6, just didn’t make any sense and the Nikon/Cannon/Sony’s may produce the same or better digital images, the feel of them is just much different than film. The M9 has the CCD sensor which was replaced with the improved version, which is known for being better than the current sensor CMOS for producing film like images. He says it’s not worth it for the latest and greatest M-11P.
The Leica M-E set up includes:
-Leica M-E body
-Voigtlander 40mm f1.4 M mount lens (no front lens cap)
-Voigtlander 21mm f4 M mount lens
From the owner:
“As far as advice, all I can really say is just get out there and shoot with it and learn the feel of the rangefinder system. You’ll miss shots you thought you had as you learn, but you’ll eventually get a feel for things. It’s like shooting free throws or playing guitar–you have to develop a feel with the ball and basket, or the instrument, or in this case, the camera. And I’d advise you to keep the rear screen turned off for shooting once you get a feel for the camera, as this will give you much more of a proper Leica camera shooting experience and will keep you from developing a habit of always checking the screen instead of keeping your eyes out for another good shot.
As far as lenses are concerned, I went with Voigtlander because they are very high quality and cheaper than M mount. I knew I’d want more than one lens, and buying just one Leica lens for me was cost prohibitive. I got those two modern Voigtlander lenses new for less than one preowned modern Leica lens and I was more than satisfied. The optics are not as “perfect” as Leica glass (the 40mm WILL vignette at the edges when wide open, and it is not a flaw–it was my favorite part of that lens actually, and lended to some really ethereal, beautiful shots), but they are great lenses and deserve a spot in any Leica outfit.
I went with the 40mm because I wanted the huge 1.4 aperture and the vignetting (vignetting is gone at about f/4 by the way), and for me personally 35mm is a tad too wide and 50mm lenses were very expensive–the extra 10mm of focal length was not worth it for me. As for the 21mm, I wanted a huge wide angle without going fishbowl, and the 21mm is a true classic in the Voigtlander range. It fit exactly what I was looking for.
I’ll be on the hunt for an old M3 or something at some point, but for now I am grateful I experienced the M system with such a great example.”
Mantras from Uncle Stephen:
F8 and be there.
Meter off your hand and add a stop.
Photography was never about the camera or the glass and never will be.
Leica M 240 Manual
Leica M 240 Tips:
Random Notes on the Leica M
Ken Rockwell says:
The M9 is a superior camera, but very different from SLRs. If you are new to the LEICA, don’t go mortgaging yourself to get one until you are familiar with the differences between Rangefinder and SLR cameras.
The camera never makes the picture. I could do just as well with a point-and-shoot. The M9 just makes it faster and easier, and thus expands my seeing a bit.
The M9 is smaller, lighter and better for what I like to shoot digitally than anything ever from Nikon, Canon, or anyone. Of course I prefer film, and the LEICA M7, CLE and Contax G2 are tops for shooting 35mm.
The M9 is the world’s top camera for in-the-field capture of reasonably still subjects. As a manual-focus camera with the world’s best optics, technical quality is unbeaten.
This level of quality in such a small, light and quiet camera means that for many people, the M9 replaces big old DSLRs.
Simply adapting a LEICA R lens to a 5D Mark II won’t come close: the R lenses are inferior SLR lenses, not the open-class rangefinder lenses of the LEICA M9, and Japanese DSLRs use anti-alias filters to dull the resolution from their sensors.
I’m not a good enough photographer to capture moving things, like my kids, with a manual-focus camera like the M9. For photos of my kids and general reportage, I prefer any SLR, like the Nikon D40.
As a compromise, the Nikon D700, D3 or D3X offer more speed and flexibility than the LEICA M9 for reportage and photographing things that move. Any of these Nikons is a lot bigger and heavier, and should offer sloppier performance due to generally inferior optics for landscape use.
Some say that the LEICA M9 is the smallest, lightest, highest-quality digital camera ever created by the hand of man.
The all-metal LEICA M9 is less expensive than the old Nikon D3X, and weighs over four ounces (120g) less than the plastic Nikon D90. The M9 weighs only 2.4 oz (69g) more than the dinkiest Nikon D40. The LEICA M9 is the most important digital camera introduced since the Nikon D1, the world’s first practical DSLR, in 1999. The LEICA M9 is a rangefinder camera, not an SLR. The LEICA M9 is the world’s best digital camera for travel, nature, landscape, interior and outdoor photography.
The reason the LEICA M9 is so superior is that it offers, all in the same camera: The LEICA M9’s excellent sensor, coupled with LEICA’s superior optics, leads to better overall technical image quality than is obtainable from Canon or Nikon. Yes it is true that with some certain exceptional lenses one could get the same quality from Nikon or Canon, but especially with wide lenses, neither Nikon nor Canon can offer the same always exceptional image quality that comes from every LEICA lens, including many LEICA lenses decades old. LEICA has made no dogs. With Nikon or Canon, you have to pick just the right lens, which is why I have to write tons of reviews sorting out good from bad. Even with the best SLR lenses, you still need to choose the optimum aperture and zoom setting for the best sharpness and least distortion. With LEICA lenses, they are all excellent, even wide open, and have vanishingly low distortion.
Random TIPS from Stephen…
In terms of soft images. You most likely understand ISO (film speed)? Your camera has multiple settings. On the shots you shared do you recall the ISO?
Look this up in your manual or on line on where and how to set it.
The work around in low light is to jack up your ISO. If, for example it was set at 200. Adjust the ISO up to where your shutter speed is no slower than 1/30. Better to shoot 1/60 hand held, though this depends on your steadiness.
One of the things that was problematic with earlier chip technology was the sensors tended to artifact at higher ISOs. Try shooting the same image at 200, 400, 800, and 1200 ISO.
Then open the downloaded images and zoom into the file to see how fine the detail is. If there is noticeable differences in pixel quality. In my earlier digital camera, they were terrible once I pushed the ISO past their lower settings.
Now, on the D4 that is not an issue. Can’t say how this translates with Leica digital?
One more thing.
If you shoot in raw file there is a selection for sharpening.
My raw files, which I don’t have sharpening selected, are soft when I bring them into photoshop.
I then manually sharpen them.
The files you forwarded will be greatly enhanced once you run them through an image adjusting software.
The files don’t look ‘bad’, just unsharpened.
Leica has tech support 800 222 0118 .
Be leery of shooting advice from websites trying to sell gear. He never made his bones as a photographer and I have no interest in his opinions beyond gear. So when he advises 6000K for a Leica look, he’s dead wrong!
Color with Leica was predominantly a film issue. Your color would reflect your film choice. Of course, that is why they make filters. So, warming filters were very useful when I shot film. I relied upon them truthfully because the film I shot here in Colorado where there is a great deal of ultra violet light, looked on the cool side. However, with digital photography, it’s a non issue.
Study Lightroom on Youtube, with color balance, a focus to begin with. Also, post production sharpening in light room. And lastly, the raw file converter in light room. It’s important to understand how to maximize your raw file, to include, selecting the optics, sharpening, exposure, color balance, and shadow and highlight adjustments.
I will say that if you decide you want to be the driver, not the passenger, you set your camera to the Manual setting for it’s operating program.
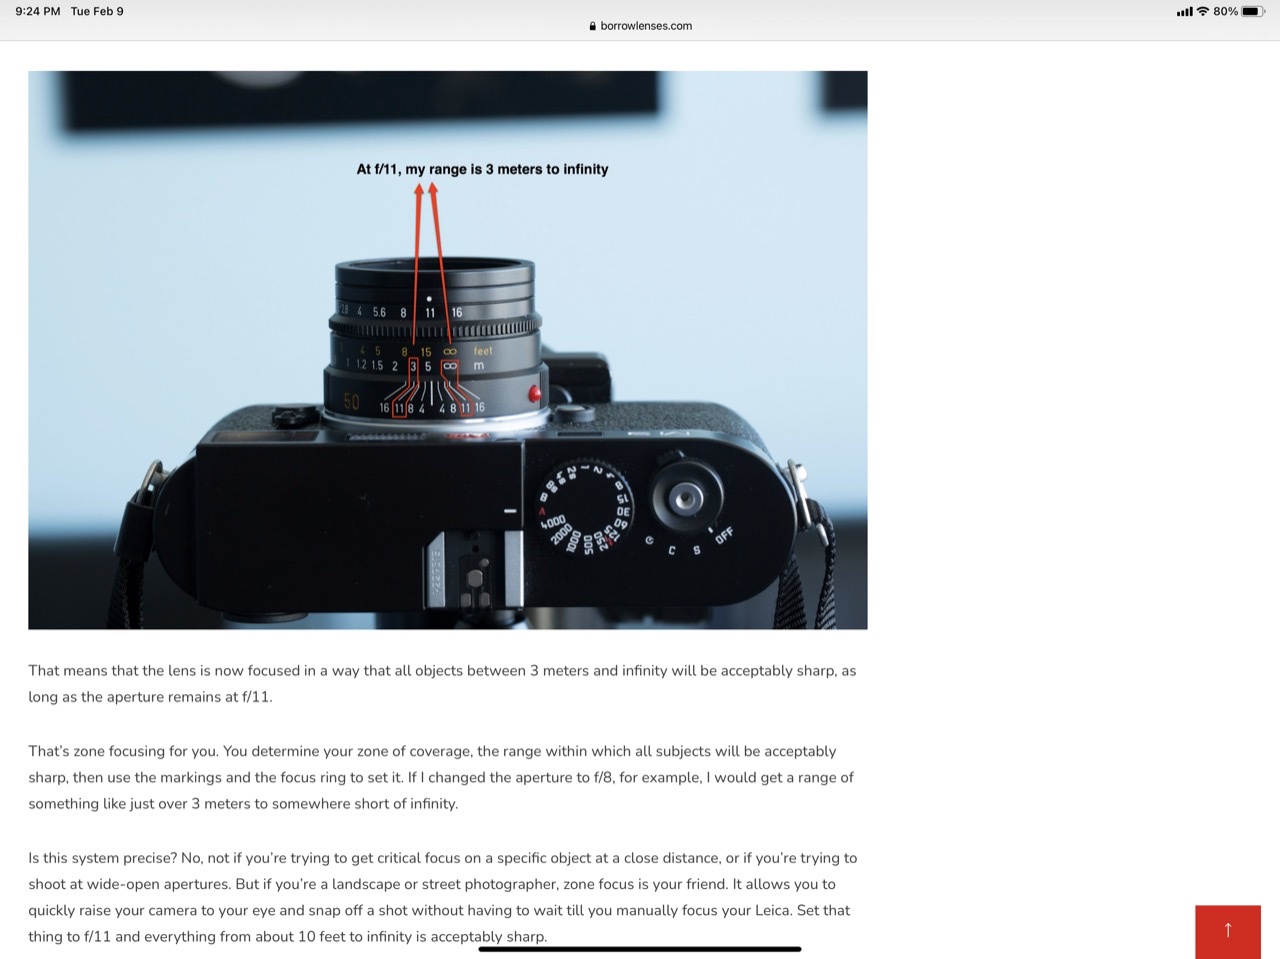
This means, you set the f stop and the shutter speed. The f stop (aperture) will determine how much depth of focus you require. If you don’t care, you could operate the camera at f8 or f11. Then scroll the shutter wheel until your meter reads you have the correct exposure. This will train you to make the decision, not the auto functions which allow for no input creatively.
As for your images beginning to artifact over 800-1600 ISO, that doesn’t surprise me. It is unfortunate. Nikon and Canon, being photojournalist workhorses, require little pixelation at very high ISOs because pros need to be able to work without supplemental lights in many cases. So, the chip developers found a way to increase the sensitivity of the chip without compromising it’s smoothness and quality. Here is the phone number of Leica tech support 800 222 0118.
Leica obviously didn’t engineer your camera for a wide range of lighting conditions where high ISO is required. I’d make a call to tech support to discuss this issue. The work around is to use a flash in low light. Then you can still shoot at 200 ISO for example and have little in the way of artifacting. Also, many folks with a speed light think they need to use one of it’s programs, like TTL, which they wrongly assume can do the thinking. It’s a lousy program. Once again, set to manual and then adjust the flash output. I like to ‘wink’ in a little front fill and use a combination of flash and ambient light. If inside and the meter says f8 at 1/4 of a second for example, then increase the shutter speed by a stop and set the flash to be at, say 1/8th power. This way you get a much more detailed overview of the entire scene, not just where the flash can reach.
The good news about shooting in manual setting if you select raw file is that you can make exposure mistakes and still work the raw file into something workable. Not so with jpg. The jpg is great as long as you nail the exposure. But if it’s too dark, there will be no information in the shadow areas.
If it’s to overexposed, then the highlights are blown out and can’t be reclaimed. Raw is like shooting a film negative. Plenty of latitude.
The most important part of all of this is to pick up the camera, take off the lens cap, turn it on and shoot.
Leica M hacking the settings
First way, the easy half-assed all-around way:
- 400 iso
- Auto aperture
- F stop turned as needed based on light reading in half shutter push
- Then focus
Stephen thought it was an ok idea to set for B&W and Color saving of photos described below at the same time, at say 400 iso outdoors and 800 iso indoors versus auto iso, daylight color balance, aperture priority on the shutter speed wheel, then just then adjusting f stop and focus, given my limited purposes with this camera (to try to replicate your afield shots with limited real knowledge and minimal tinkering around)?
Second method, Shoot Wide Open:
Put your fstop as wide open as it gets, f 1.4 or 2.0. Set ISO to 800 for indoors or 200 for outdoors. Auto aperture. Take care when focusing, as focal window will be very narrow.
Third method, the Master’s Way:
Just pick up the camera, set at shutter priority to something you can hand hold (1/60th), it’s a cloudy day today, so your light levels are quite a bit lowered and shoot. If it’s too dark, jack the ISO up another 100 ISO and accept the loss of quality. An unfocused or unsteady photo is worthless so a slight loss of detail is worth it. And PRACTICE.
In terms of aperture, making these kinds of determinations is all about what you want, or don’t want, to be in focus. F8 is a middle point. Neither here nor there. It allows for quite fast shutter speeds. I tend to shoot my film Leica at f 11 or f 16 because, I am seeking in the field that is, a great deal of depth of focus. With a portrait, F 5.6 is nice. Not too wide open. To open the lens to its widest aperture requires careful focus and subject stability. It’s quite easy to blow your focus wide open. I do this rarely. If you stop down twice to 5.6 you still have shallow depth of field with improved change to focus.In terms of portraits, a rule is, focus on the closest eye. If you do this, then the picture is good. If not, it’s a failure. You don’t need shoot at ISO 400 on sunny days. Better to choose 200 and get high pixel resolution, thought that is splitting hairs.
Like everything else, the rest will sort itself out over time. There is no urgency, no New York photo editor demanding perfection.
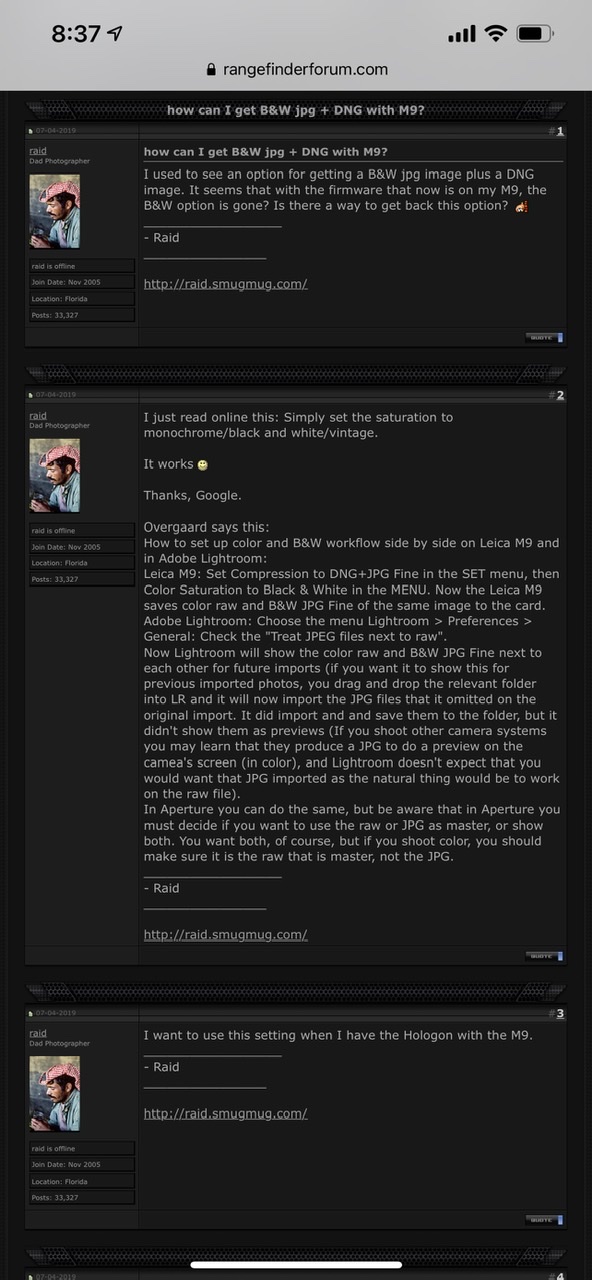
Final tip, taking B&W and Color simultaneously:
How to set up color and B&W workflow side by side on Leica M9 and in Adobe Lightroom:
Leica M9: Set Compression to DNG+JPG Fine in the SET menu, then Color Saturation to Black & White in the MENU. Now the Leica M9 saves color raw and B
Adobe Lightroom: Choose the menu Lightroom > Preferences > General: Check the “Treat JPEG files next to raw”.
Now Lightroom will show the color raw and B&W JPG Fine next to each other for future imports (if you want it to show this for previous imported photos, you drag and drop the relevant folder into LR and it will now import the JPG files that it omitted on the original import. It did import and and save them to the folder, but it didn’t show them as previews (If you shoot other camera systems you may learn that they produce a JPG to do a preview on the camea’s screen (in color), and Lightroom doesn’t expect that you would want that JPG imported as the natural thing would be to work on the raw file).
In Aperture you can do the same, but be aware that in Aperture you must decide if you want to use the raw or JPG as master, or show both. You want both, of course, but if you shoot color, you should make sure it is the raw that is master, not the JPG.
———————————————-
More general tips from Uncle Stephen
One thing that tends to be overlooked in terms of photography is the part of one’s emotion play in the process. Men are taught during their domestication that ‘big boys don’t cry’. It’s easy to take this to the next step of, ‘big boys don’t feel’. It’s my emotion blended with instinct coupled with my sense of aesthetic harmony that trigger my depressing the shutter. It’s not just a case of imitation, though we all do that in one form or the other.
“What use is having a great depth of field, if there is not adequate depth of feeling?” — W. Eugene Smith.
The silver 50mm lens was manufactured between 1956 – 1968. The 50mm summicron I currently shoot was the type 3 made between 1969 – 1979. It’s got higher contrast, but resolution is superior in newer models. That said, I’m quite pleased over all with its performance.The silver lens is pretty beat. However, despite it’s vintage they were very sharp lenses.
The Summilux would be superior but it’s quite a bit more and, once again, you are not likely to be able to notice the difference. I’d call my pal Vahe to discuss this stuff as he’s a Leica expert. (303) 589-2765. [Vahe said the same thing, the Voigtlander is a great lens, no reason to replace it and went through all kinds of technical details to justify his answer.]
What the link you attached points out isn’t so much the sharpness of his images, or the quality. What I see is someone dedicated to taking pictures. That is where it all starts and stops. Voigtlander has always had a more than solid reputation in the field. The 40mm lens is a workhorse.Walk before you run. Shoot the camera a ton. Process the raw files. Get experience using lightroom. The rest will reveal itself.
On a day fishing, the best situation would have the camera always with you. But, with an expensive unit, this may be unrealistic. The other option is to carve out some time for the camera work, then set it aside and fish. This is usually what I do because, one can take a fall at any time during the day.A wading staff is handy for when you wan to use the camera and require more security. My camera last summer on assignment would be on the bank, out of harms way about 65% of the time. I’d use it enough to cover what was needed and if I had to, I’d wade back to the bank and retrieve it….
Try to understand is not how wonderful the eight pics you shared with me or not. But, more importantly, that you made the effort. It’s plenty ‘good enough’ for a start. Just think, the more reps you get, the more discerning you will inevitably become.
It may be a factor of my education (English Major) but I tend to approach making a photograph as a narrative. Simply trying to tell a story with an image. That subject matter can be refined into simple information to advance narrative. Capturing the information at times is sufficient. (of course there are ways to jack this up but a day afield doesn’t require much in the way artifice). If you do this, you’ve met goals in making photos.
It is a simpler way to approach subject matter than trying to imitate for example. It demystifies the entire approach. And if being clean and succinct isn’t good enough.
Be leery of shooting advice from [web sites touting gear]. He never made his bones as a photographer and I have no interest in his opinions beyond gear. So when he advises 6000K for a Leica look, he’s dead wrong!
Color with Leica was predominantly a film issue. Your color would reflect your film choice. Of course, that is why they make filters. So, warming filters were very useful when I shot film. I relied upon them truthfully because the film I shot here in Colorado where there is a great deal of ultra violet light, looked on the cool side. However, with digital photography, it’s a non-issue.
Color Balance—-Study Lightroom on Youtube, with color balance, a focus to begin with. Also, post production sharpening in light room. And lastly, the raw file converter in light room. It’s important to understand how to maximize your raw file, to include, selecting the optics, sharpening, exposure, color balance, and shadow and highlight adjustments. I am not a proponent of using a setting of 6000K as a general rule. The settings usually available are daylight, incandescent, etc.
As a rule I shoot the daylight setting if outdoors. There is also a cloudy setting that can be explored. If indoors and your are in an incandescent light environment (household light bulbs), then by all means, select this setting.
Color is an endlessly subtle factor in photography. I’ve been advised to avoid using auto-color in the camera’s menu. The reasoning being that it creates an algorithm that is difficult to color correct.
Of course, liking warmth in photos is a personal preference, but one not specific to Leica photography.
Sharpening Images—If you shoot in raw file there is a selection for sharpening. My raw files, which I don’t have sharpening selected, are soft when I bring them into photoshop. I then manually sharpen them.
The files you forwarded will be greatly enhanced once you run them through an image adjusting software, he writes.
His critique on a few of my first files were that they don’t look ‘bad’, just unsharpened.
ISO Explained
In terms of soft images. You most likely understand ISO (film speed)? Your camera has multiple settings. On the shots you shared do you recall the ISO? Look this up in your manual or on line on where and how to set it. The work around in low light is to jack up your ISO. If, for example it was set at 200. Adjust the ISO up to where your shutter speed is no slower than 1/30. Better to shoot 1/60 hand held, though this depends on your steadiness.
One of the things that was problematic with earlier chip technology was the sensors tended to artifact at higher ISOs. Try shooting the same image at 200, 400, 800, and 1200 ISO.
Then open the downloaded images and zoom into the file to see how fine the detail is. If there is noticeable differences in pixel quality. In my earlier digital camera, they were terrible once I pushed the ISO past their lower settings. Now, on the D4 that is not an issue. Can’t say how this translates with Leica digital?
Fourth method for hand metering f-stops with film, probably not necessary for what we are doing:
Stephen writes, so, this is a ‘trick’ I learned from my photography teacher friend, Tom Fink who lives in Denver.
Shooting negative film, you take a light meter reading on the palm of your hand. Your meter is engineered to read the entire scene and interpret it into the middle tonal value of 18% grey. Well, one’s palm is brighter than grey. So, I take such reading and then open the aperture 1 stop.
This ‘places’ the value on, instead of zone 5 (18% grey) to a zone 6, the value of caucasian human skin tone. It’s very accurate and doesn’t require a spot meter, (which I also use to determine highlight and shadow value which determines how to both expose and develop one’s film, a la Ansel Adams in his zone system manual.)
I wrote: The Leica is a lot like fishing the South Platte, it appears simple but it can be more complicated than it appears. There are so many simple variables, that it is puzzling at first to wonder what might make a difference and what might not, but it’s easy to see that there are some fish there so you know what you are using isn’t working. Where as the DSLR is a lot more like fishing at Boxwood Gulch, you know most anything is going to work reasonably well. Anyway, I’m getting it figured out and it’s definitely more “artsy” of a pursuit for landscapes and portraits or whatever with the Leica, compared to the spray and pray polo shooting which searches for dynamic action. And, thanks for steering me away from going crazy with gear shopping as it’s easy to do with Rockwell telling you that there are a million things you could buy that would make a difference. I can appreciate now, after just a short while with it, how it’s not going to make a big difference for my purposes as Rockwell led me to believe. I have tried a few different general setting methods, which is kind of like selecting a rod for bait fishing or one for fly fishing size 2 line while nymphing the RS2: The f/8 all the time, (what I now call the be there method), Auto aperture. 400 iso all the time. The f/1/4 all the time (the shooting wide open method) auto aperture, 200 iso outside or 800 iso inside. Metering off the hand and increase one stop. Definitely takes a little longer than the other two but I can see why this is the master’s way, together will all other manual settings, which I haven’t obviously perfected yet, so I am enjoying the first two methods more than this one so far. Both of the first two general methods work reasonably well.
His reply: With a digital I don’t know whether you require making a light meter reading off of your palm. That is a film thing, where by, using Ansel Adams’s zone system, he interpolated that caucasian flesh is zone 6. That requires an interpretation for a light meter, built in or not.Not necessary for you.
As for working on raw images, the rule of thumb in all forms of photography, film and digital, has been the goal is to have texture in your highlights, and some detail in the shadows. What made Ansel Adams such an extraordinary printer was how dark his blacks were without sacrificing all shadow tonality and how bright his highlights were while holding some texture, not allowing them to be blown out to pure white.
In photoshop there is a took called shadow/highlight in image adjustments. This is a quick way to address high contrast with the sliders that move independently.
I use photoshop exclusively. I intentionally purchased their last stand alone disc, CS6. That way, I don’t have pay them monthly, as if they are a utility. Of course, my older version might not support newer camera raw files. I’m trying to stop the bleeding with this endless upgrading. It’s not what photography is about.
As for the framing of black and white photo prints, I’d use at least 4 ply spanish white rag. I would cut a reveal of 3/8 around the image. Float it up 3/8” . Black frames look pretty clean.
Maybe a tad too much contrast.
Not too sharp.
Keep trying for a balance between texture in the highlights and detail in the shadows without sacrificing overall contrast. It’s subtlety that is the goal here and will require you experimenting.
Also, contrast is akin to style and over time our taste changes in this regard. There is no real right way to apply contrast. Once you find a balance, then that is simply your ‘take’ on what is harmonious.
Michael Horner was his assistant and then went away and came back to Boulder, then teaching Stephen how to do digital photography several decades ago. They hooked a camera directly tethered to a laptop, which provided instant gratification that only polaroid offered before. Nowadays you can do the same thing afield if knowing you got the shot is critical. Get a Hoodman loupe which is a 2 or 3 power magnifier for seeing the viewfinder on a Leica, as the viewfinders are not as good as the Sony, etc. This reminds him of when he used a Hasselblad tethered to monitor.
Move forward, back up or use rule of thirds to get better compositions. He wants me to practice. Let the chips fall where they may. You can’t learn how to ski from a video and the more time you go down the slopes the better you are going to get, so pick up the camera and use it. Examine the four corners of the shot first, like Ansel Adams did. Then Get low and move closer and do it again. You’ll see the difference.
It’s a recording device. Photography is like hunting, and both are a right place, right time proposition. You put some gravitas in the record making by using a camera versus just writing about it. You take photos, as records. The records seem rather benal when you are making it. It becomes an antique at my age. It has its own gravity at that time and, hopefully, if you are lucky, over time. That’s more important than the optics. That’s what it is all about.
Some Random Favorite Photos of Other Pros

For Leica Artistic Shots of Polo Try This
ISO of 2000 in daylight will require a super fast shutter speed. I should think if you want to shoot f8 (which will give you a modest depth of field) you should experiment with the ISO. For action 1/500 of a second should suffice if you want to freeze it. If you want to pan the camera with the subject to achieve motion blur try a shutter of speed first of 1/30th, then experiment with 1/60. If you really track the body along quickly it will blur the background, not the action if you are moving parallel at approximately the same speed. Of course, if you want extreme blur, slow shutter to 1/15 and track action. You might be able to blur the background as fast as 1/125 of a second. When trying for arty, if you use manual settings, and say set the aperture on f8, then move the shutter dial until you get the proper ratio for the meter to align. This will give you the information of how or where to adjust (up or down) ISO.
If you want to shoot f8 (which will give you a modest depth of field) you should experiment with the ISO. For action 1/500 of a second should suffice if you want to freeze it. If you want to pan the camera with the subject to achieve motion blur try a shutter of speed first of 1/30th, then experiment with 1/60. If you really track the body along quickly it will blur the background, not the action if you are moving parallel at approximately the same speed. Of course, if you want extreme blur, slow shutter to 1/15 and track action. You might be able to blur the background as fast as 1/125 of a second. When trying for arty, if you use manual settings, and say set the aperture on f8, then move the shutter dial until you get the proper ratio for the meter to align. This will give you the information of how or where to adjust (up or down) ISO.
For Polo on Full Sun Days
You might google how to clean the lens. Plenty of schmutz in the sky area. I cloned it all out. I was able to adjust your underexposed file easily. I did so by creating 4 separate lays. I did 2 adjustments for the sky (using shadow/highlight and curves). I opened (lightened) the foreground in curves. I made another layer to locally lightened my form, all shadow layers. I cloned out dust. Then went back and it in curves and opened up foreground again and a little on my dark parts. You made a nice image.
The file you shared with me is why [I said the lens was excellent]. Though the exposure was incorrect and the image was very dark, once I put it in photoshop I was able to successfully get it into range. What was revealed was the image is super sharp. The Voitlander is better than advertised and in no way will upgrading to
an apo Summicron reveal a noticeably different outcome.
It’s what I was trying to say from the beginning. You have a system that will allow for full creative expression. The idiosyncrasies of better glass or more megapixels in the sensor aren’t going to make up for much of anything unless you were working for the distributor and had to do demonstrations about resolving power. Once you gain a firmer understanding of the relationships between shutter speed and aperture and how aperture affects the image, you will have taken a significant step forward.
A trick going forward. When you change lenses, hold the body so front of lens faces straight to ground. Disengage and re-engage lenses from this position. Gravity won’t allow for dust to easily transfer to sensor in this position.
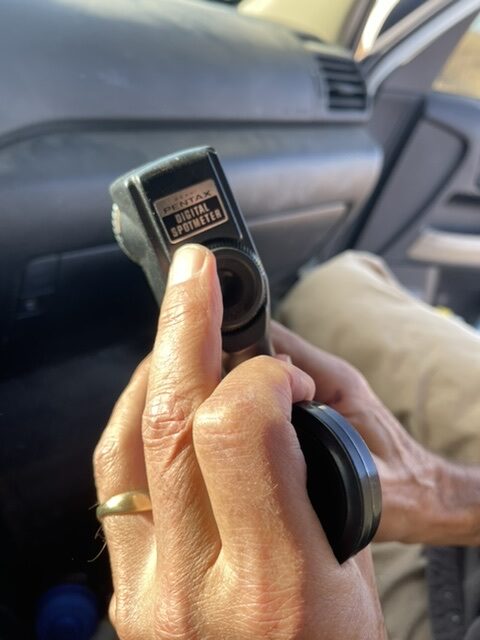
For film photography, he uses a handheld light meter. Ansel Adams used a Pentax Digital Spotmeter. It’s his favorite as well.
INDOOR POLO SHOOTING TIPS-SHUTTER PRIORITY at 1/25. ISO 2400. Continuous Focus and wide area focusing. ——If you are dissatisfied with crispness shoot at 1/500. Once you are satisfied with action sharpness adjust ISO accordingly to get brightness in range
I took a look and can see the artifacts. That being said, they are very small. And, they are effortlessly easy to retouch/spot out.
To drop 6K on a replacement as a work around makes next to no sense. I think your Leica is a terrific camera all things being equal.
So, what I deduce, is that for whatever reason, the sensor is prone to this kind of degradation.
Buying a new one may only reveal that the same issue props up somewhere down the line….
Part of shooting digital today, is post production. It’s the darkroom. When I shoot film, many times, my negatives require that I end up spotting the print. This was to be expected.
The ‘dust’ is as big an issue as you make it. I don’t see as much of one. The file you get from your M-E is better than good enough as far as I’m concerned.
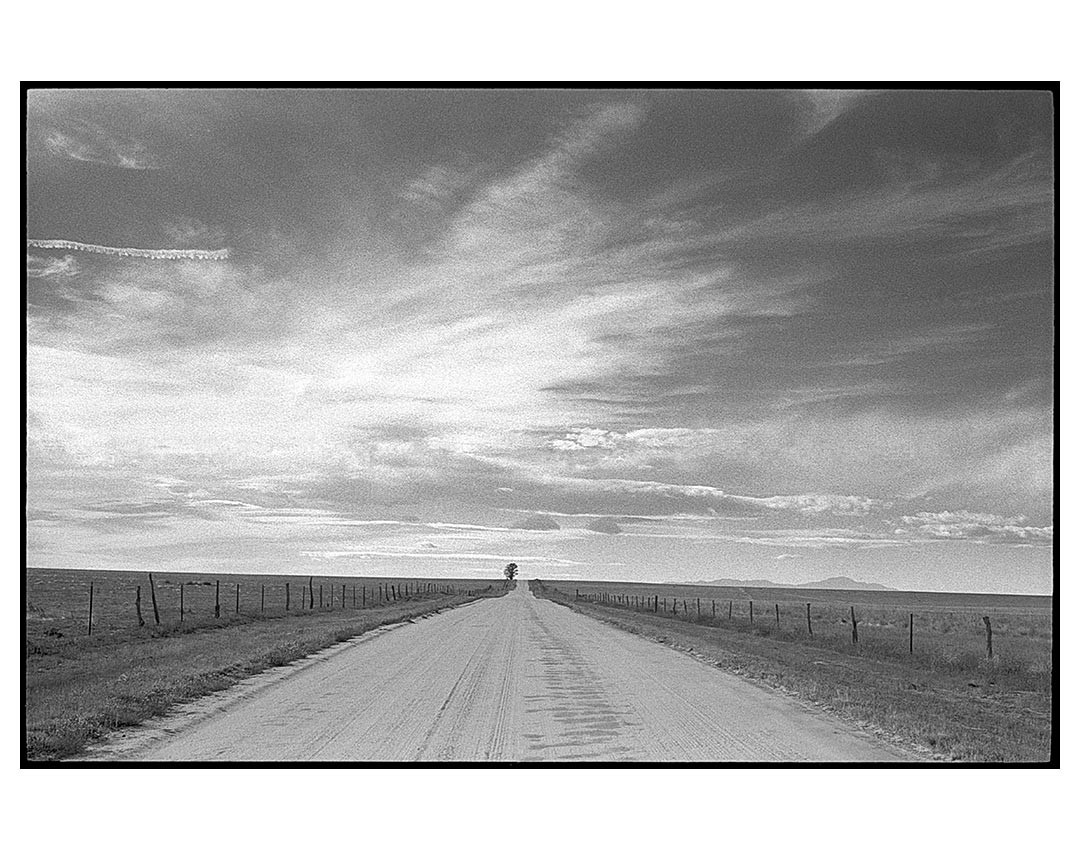
Here’s what the same shot you took looks like on film. It’s so primitive in comparison.

For the rodeo–Set ISO to 320. Then understanding the light is dim set shutter speed t lowest speed I can hand hold which is 1/15 and then adjust aperture according to light meter. All those settings are unique. And for you, I wouldn’t shoot lower than 1/30.
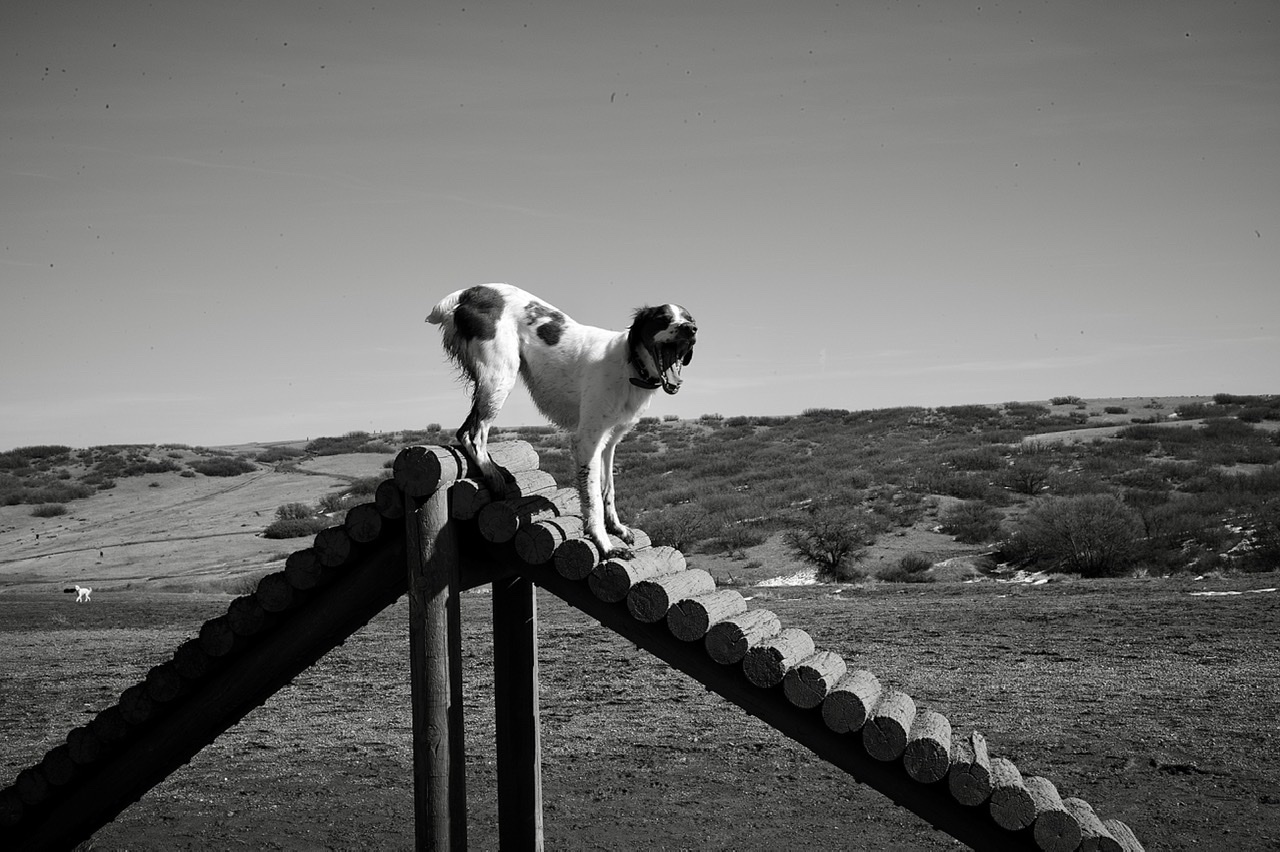
For the dog landscape, I wanted dept of focus, so I set aperture first to f11. Then adjusted shutter speed accordingly, probably to 1/125th.
If you understand that shutter speed is the baseline of what is feasible to hand hold, then aperture follows. What is more important is good depth of focus or freezing the action. Practice makes the master.
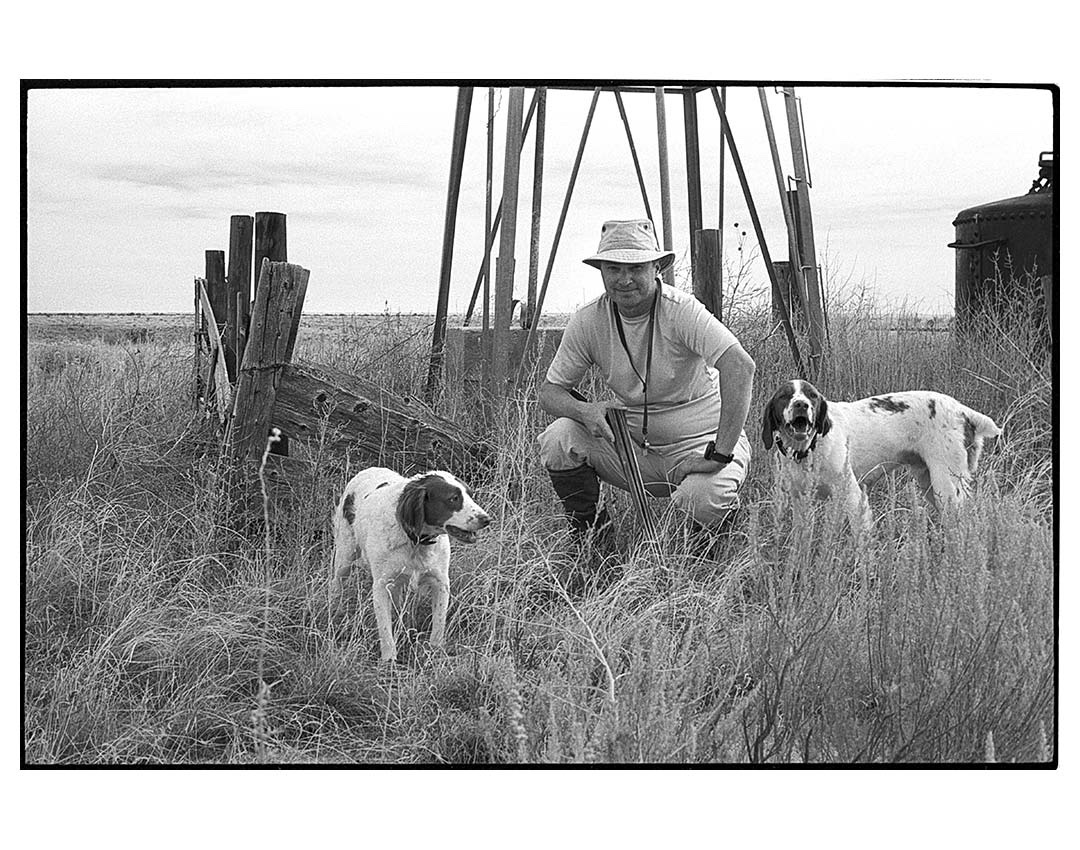
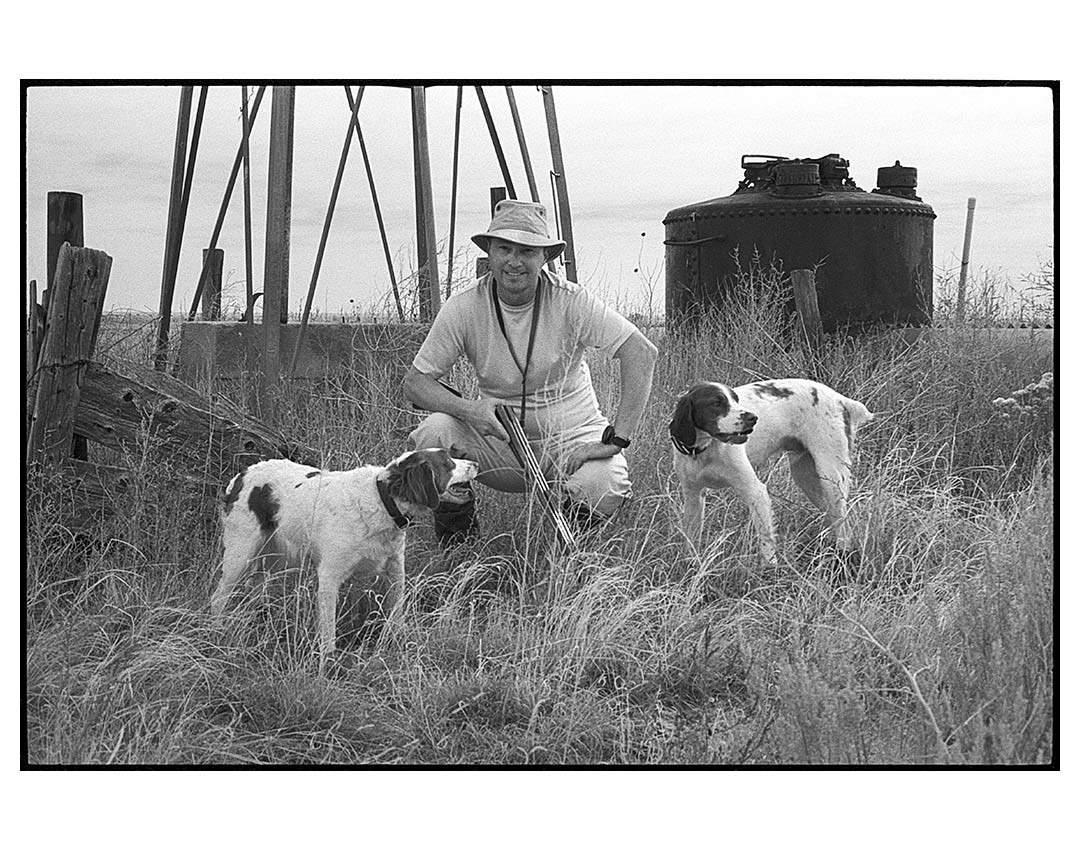
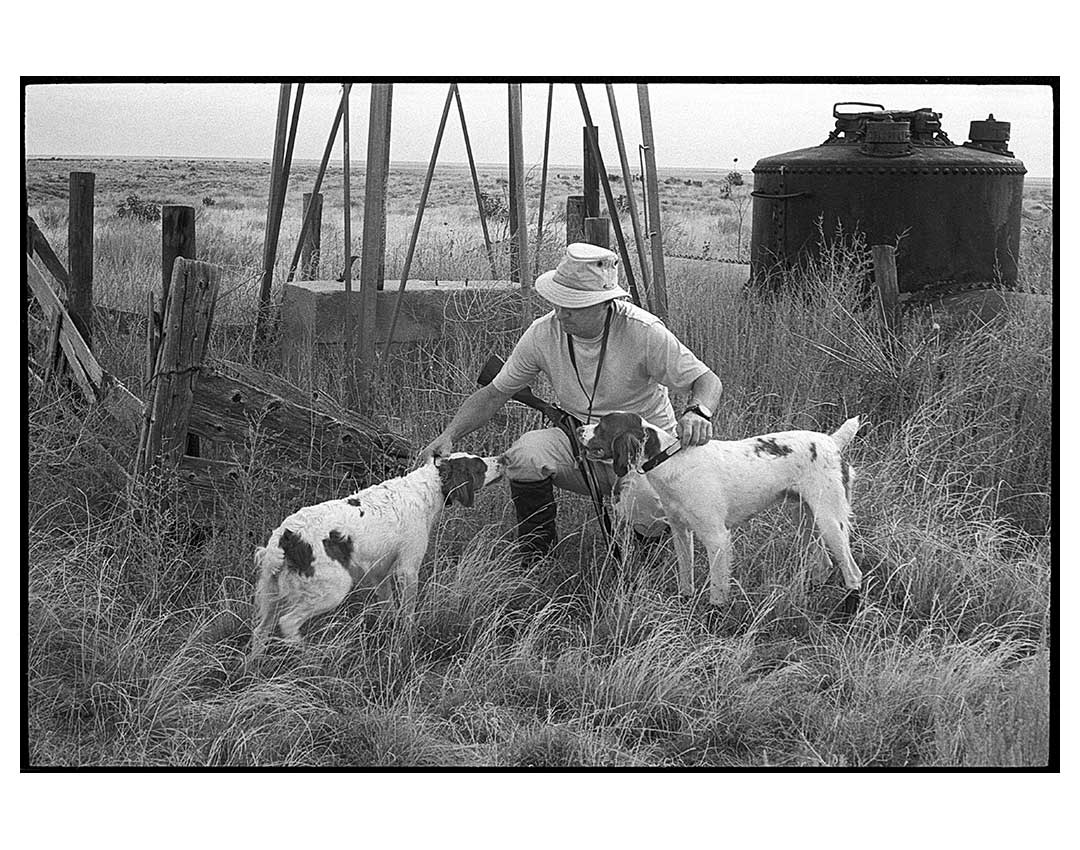
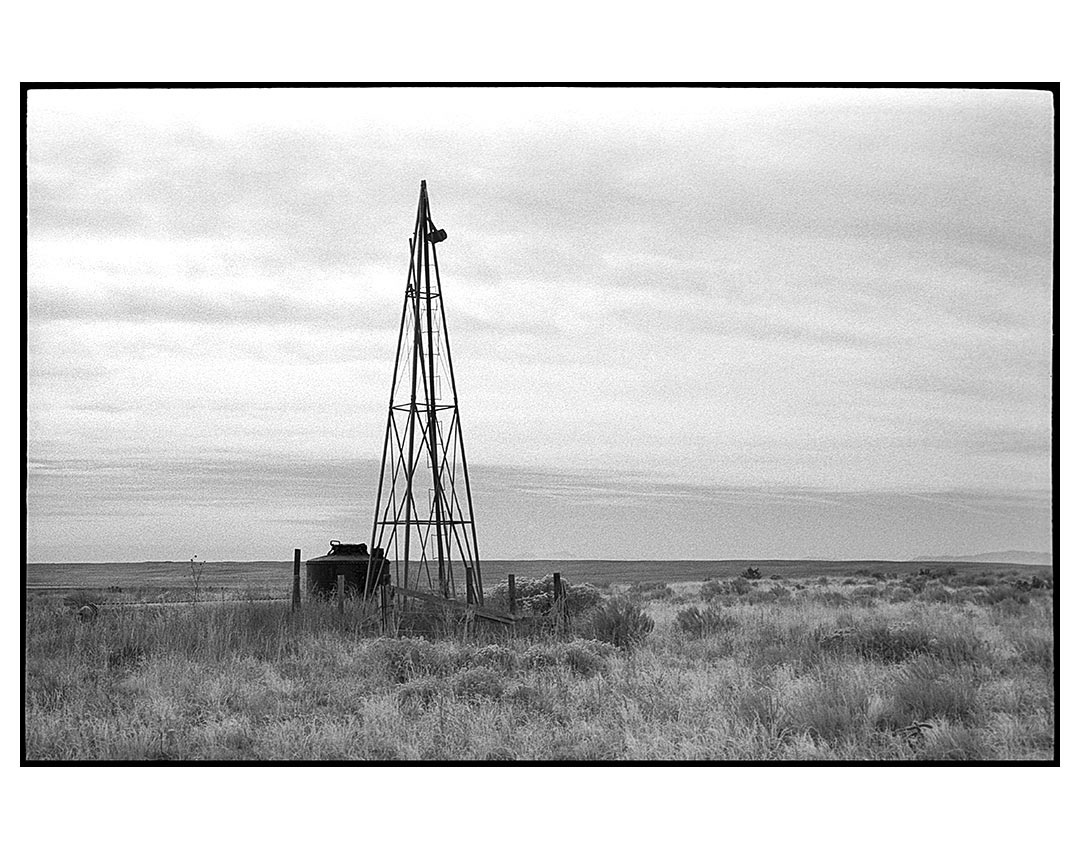
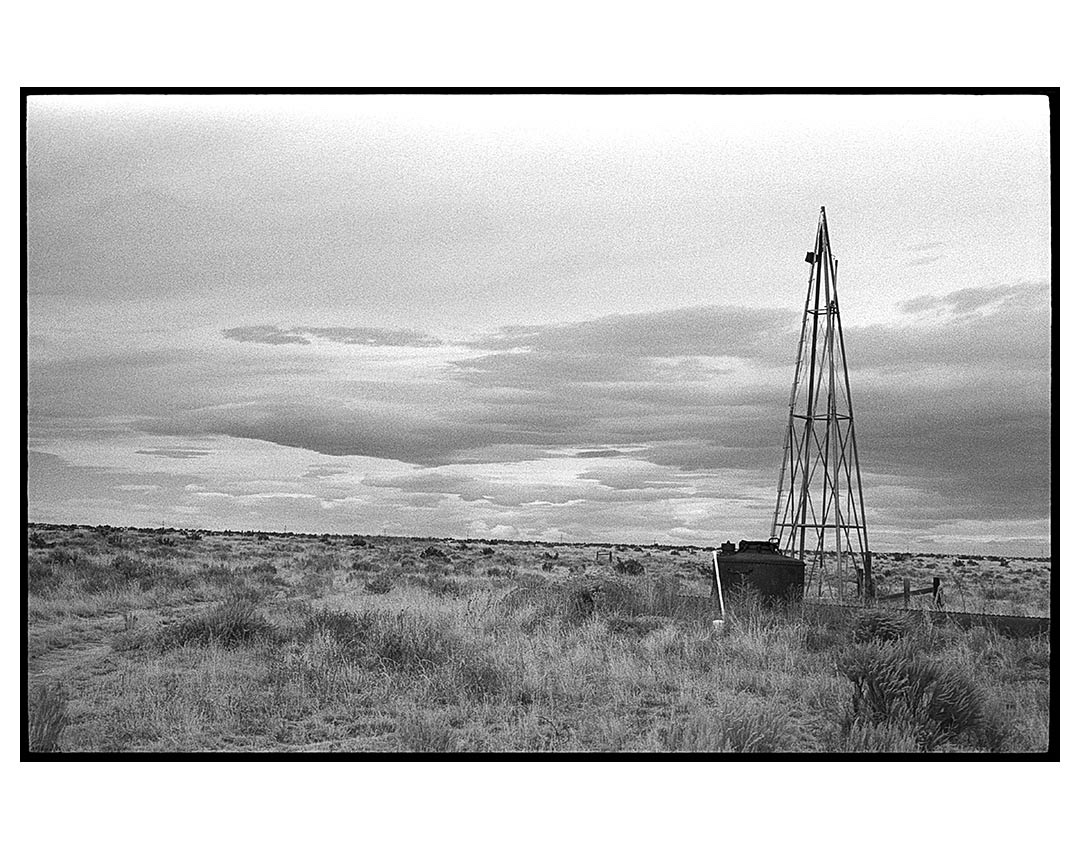

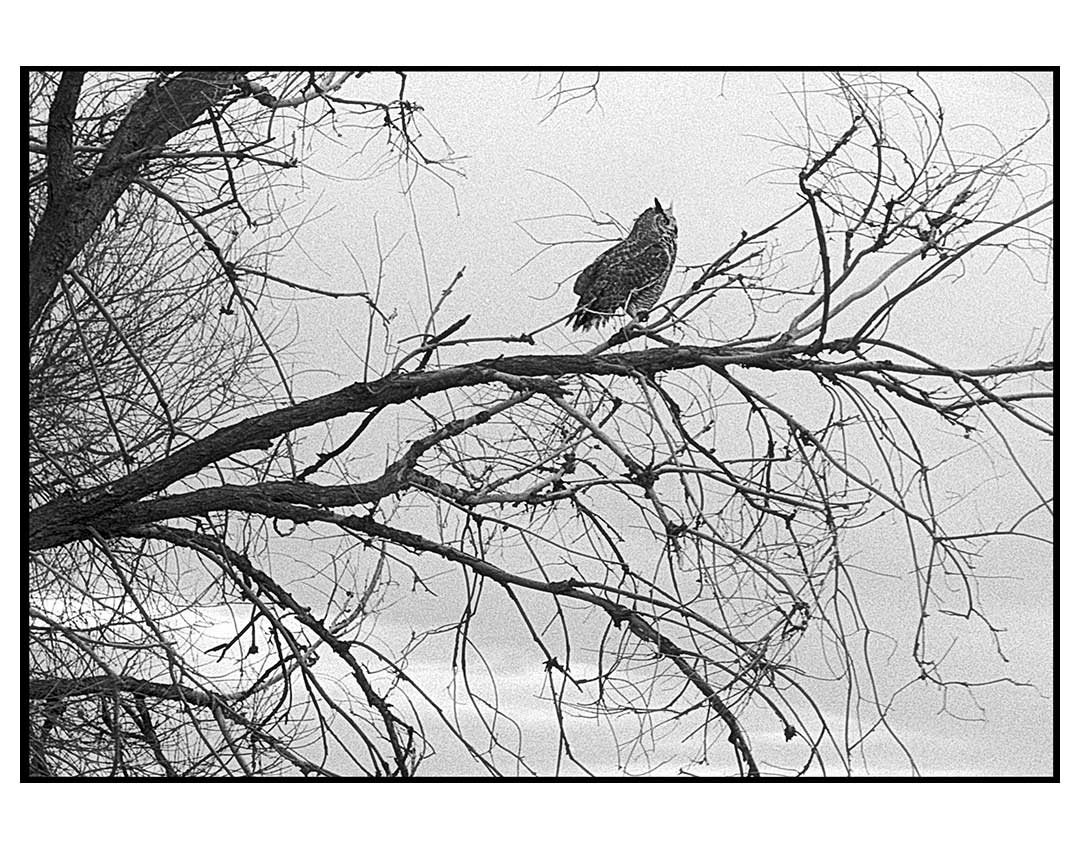
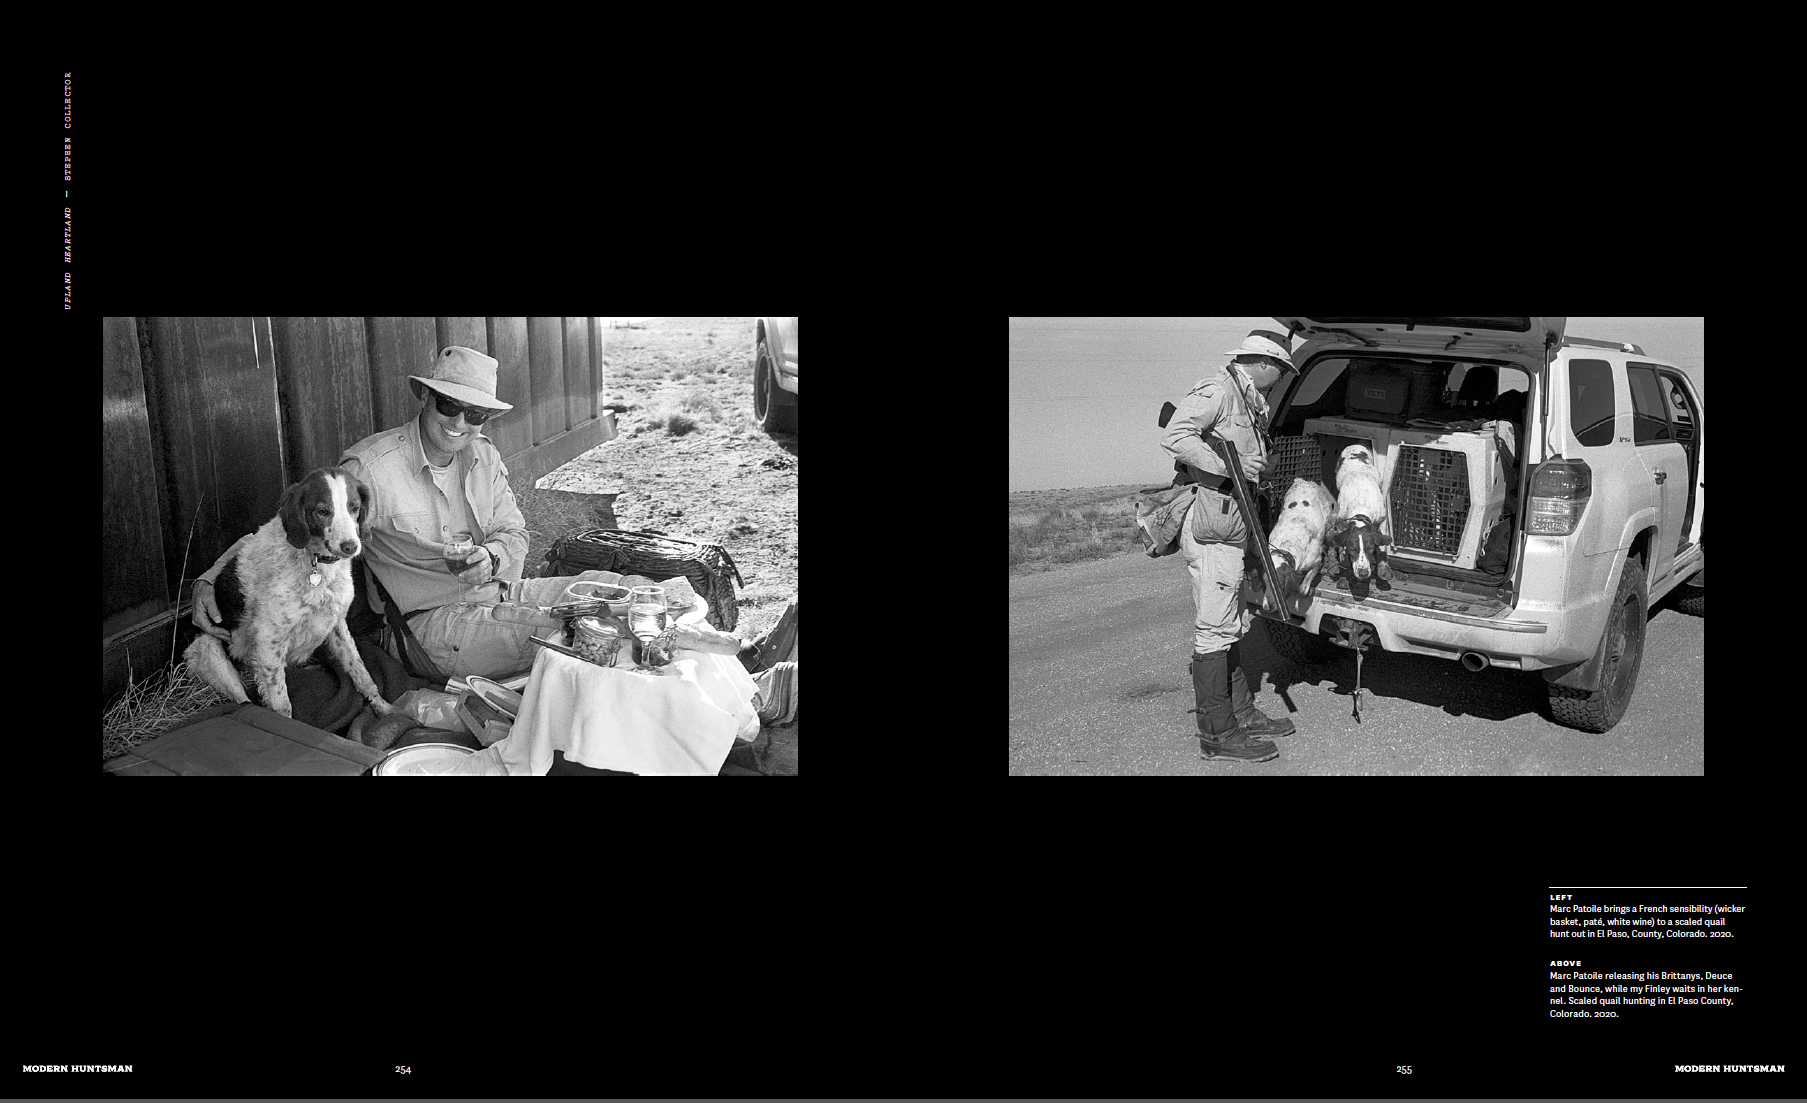
Steven’s shots while quail hunting
Nikon D4: Sports Camera Setting
Standard settings for the Nikon D4 for how I shoot. Here is a link to that post.
___________________________________________________________________________________________________
What about upgrading to full frame DLSR or higher pixel models?
You can see this in real-world photos. In a lot of everyday situations, the gap is smaller than most people care to admit. Unless you’re shooting in controlled environments like studio portraits, luxury weddings, or specialized commercial projects, full-frame cameras are harder to justify. Yes, they still have an edge—especially with depth of field and in extreme low light—but it’s no longer a dramatic, game-changing difference. At some point, you start asking yourself whether you actually need full frame for your work, or if you’re drawn to what it symbolizes.
That leads to a more honest realization: status plays a part. A bigger camera suggests a more serious photographer. Expensive gear signals credibility. It’s easy to associate great results with the most obvious piece of equipment in the shot. Padley points this out clearly—the camera often gets the credit, while the photographer fades into the background. You’ve probably felt that yourself: you watch a beautifully shot clip and immediately think about the camera used, instead of the years of experience that made it possible. And, the full frame bodies and lenses are smaller not bigger, if size matters to you.